AFO 216 – Multi-title order entry
216.1 Introduction
Through AFO 216 you can add multiple titles to one order. Proceed as follows:
1. Search for an existing order or create a new one
2. Add titles to the order
3. Close the order by setting dispatch to Yes and print the order
You can receive the orders individually within AFO 216 or through one of the specific AFO's for receving (22X).
Alternatively you can use the global receiving option within AFO 216.
216.2 Creating orders
Choose AFO 216, the system will display a search screen. You can search for an existing multi-title order or create a new one by clicking on ‘New record'.

After clicking on ‘New record' the system prompts you for order type.
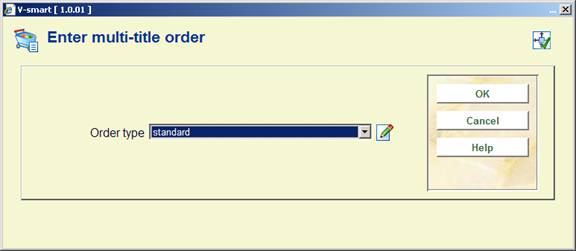
Depending on settings in AFO 272 – Miscellaneous, this input form may also contain the field Order no. See the Help for AFO 272 for more information. The system automatically assigns an internal order number to each order. The format of this order number is determined through AFO 272 – ‘Order number format'. See the description of this AFO for more details. It is also possible to enter order numbers manually. This is controlled through AFO 272 – ‘Miscellaneous'. See the description of this AFO for more details. A manually entered order number must be unique within the meta institution.
If you use a mixture of automatic and manual order numbers, the system will apply any separator and length defined for automatic order numbers also to manual order numbers. E.g. if the separator is '-' and the lenght 5 for a prefix of 2009 the system will generate an automatic order number of 2009-12345. A manually entered order number of 2009AXAXAX will then be displayed as 2009-AXAXA-X (a dash after the prefix and after 5 characters).
This number can be used on the search screen in AFO 111/211 to retrieve bibliographic records.

After clicking ‘' you can link a supplier.

Next the multi-title order screen is shown:

The discount percentage is taken from the supplier record as a default value. After clicking ‘' you will be offered the order header:

The order header consists of order type, supplier information, total commitment (sum of the commitments for the linked titles), number of order lines; default discount and tax percentages; internal notes and supplier notes.
The statuses as shown in lines 7 through 12 are applied as with the detail lines of an order.
By changing the supplier on this screen you also change the supplier for the linked order lines.
The discount and tax percentages defined on this screen are the defaults for each new ordered title.
Options on the screen
: Select a line and then this option to modify the line details.
. Select this option to print all the order lines. You can no longer add titles after the order has been printed.
. Click this icon to show the current titles linked to this order or to add more titles to this order. See section 216.2.1.
: This option is no longer available once detail lines have been added.
: Selecting this option will bring up a popup screen with some information about the status of the order.
: See the help for AFO 275 for more information on archiving.
: See the help for AFO 275 for more information on archiving.
: See the help for AFO 275 for more information on archiving.
To complete the order en ensure it will be printed you must set the dispatch status on the order header screen to Yes. This ensures that the status for all associated orders will be set to Yes. The order can then be printed in the normal way via AFO's 251, 252 and 253, just like for orders created via AFO 211.
You cannot add new titles to a completed order.
216.2.1 Detail lines
. Click this icon to show the current titles linked to this order or to add more titles to this order. The detail screen is shown:
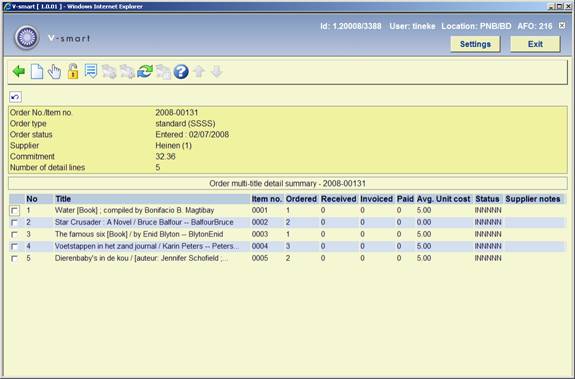
This screen shows static information and a grid. The static information is protected and contains order number, order type, status, supplier and number of order lines. The grid contains the order line details and shows line number, brief bibliographic details, quantity ordered, received, invoiced, paid, average unit price, status and supplier notes.
Options on the screen
. Use this option to add another title to the order. The system will display the standard search screen. From this screen you can either search for an existing bibliographic record in the normal way or click the ‘New record' button to add a new bibliographic record.
To order an existing title perform a normal bibliographic search and select a record. Double click on the field ‘Order(s)' to add a partial order for this title. If there are existing orders the overview screen with orders for this title will be displayed (you do not have the option to look at or amend detail lines from this screen). You can add a partial order for this title in the normal way (see the help of AFO 211 for detailed information). When you have finished this, the order overview screen will be displayed.
In this case there will be an intermediate screen, prompting for additional order fields. Depending on settings in AFO 272 – Additional order fields, this input form may contain the following fields (either free text or authority controlled). See the Help for AFO 272 for more information.

Note
The field Binding type is associated with a corresponding field in the supplier record. The dropdown list will only contain binding types that are valid for the supplier selected on the main order.
You can also use the button on the search form. This will take you to the summary screen with all your savelists as in AFO 141. From here you can select a savelist and from the savelist you can select a title to place an order (see above). After placing the order you will be returned to the savelist screen. You can now select another title from the savelist, go back to the savelist summary and select another savelist or go back to the search form.
: Select a line and then this option to modify the line details. You will be presented with the overview screen of an individual order (see the help for AFO 211 for more information).
: Select a line and then this option to release a blocked order (blocked status denoted by a "!" before the order line).
The systems asks,'Order has multiple lines. Do you want to release all lines on this order?'. If you click , all lines on the multi-title order will be released. If you click , only the selected line will be released.
. Click this icon to show additional information.
: Inactive as long as order has not been printed. This option is related to global receiving. See section 216.3.
: Inactive as long as order has not been printed. This option is related to global receiving. See section 216.3.
: This option is related to global receiving. Even though it always appears active, you cannot use it as long as order has not been printed. See section 216.3.
: Inactive as long as order has not been printed. This option is related to global receiving. See section 216.3.
When clicking on the ‘Back' button from this screen you are taken back to the search screen “Search for a title to add to current order”. From here you can search for another title to order or you can click on the ‘Cancel' button which will take you back to the “Order detail multi summary” screen. You can decide at any moment to stop and continue at a later time. Order lines can be added to an unsent order by searching for the order header and then choosing to add more titles.
216.3 Global receiving
AFO 216 also offers the ability to globally receive (and optionally invoice) multiple titles on a multi-title order without having to go to the detail screens for each title. The system offers the ability to select all titles, deselect all titles, toggle between select and deselect for specific titles one at a time. Once you have selected all of the titles that you want to receive, the “” command is used to receive all outstanding copies of the selected titles. The system will prompt for an invoice number. If provided, each of the selected titles will be added to the invoice using the order price as the invoice price.
Note
If this option is used to receive, there is no prompting to create barcodes, trap for reservations, print routing slips, enter price, etc. All specific settings linked to an item (barcode, trap for reservations, print reservation slips, print routing slips, etc.) will be entered by selecting each title line by line. If the price must be modified, the modification must be done in the invoice detail line in AFO 231.

Options on the screen
. This option is no longer available once the order has been printed.
: Select a line and then this option to modify the line details. You will be presented with the overview screen of an individual order (see the help for AFO 211 for more information).
: Select a line and then this option to release a blocked order (denoted by a "!" before the order line).
. Click this icon to show additional information.
: when this option is chosen, a check mark is added in front of each title on the order.

: when this option is chosen, the check mark in front of each title is cleared.
: select a line and this option to toggle the check mark in front of a title on and off.
: all outstanding copies of the selected titles will be received. The system prompts for confirmation:

If the Acquisitions system is configured with the invoice model (and the global options for receiving include invoicing) the system prompts for an invoice number.
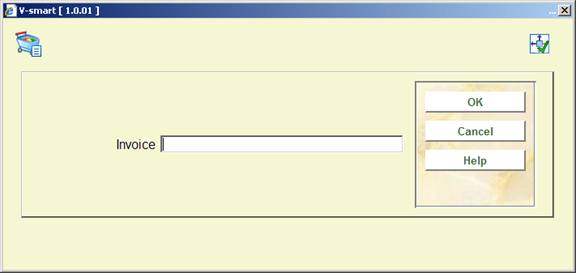
You can leave the invoice number blank, however.
Note
If you are using Receipt location lists (defined via AFO 277), only copies belonging to the Receipt location's valid item locations and material types will be received.
When the ‘receive selected titles' action is complete, all selected titles will be completely received. If an invoice number was supplied, all received copies will be invoiced using the order price.

Note
The orders on the overview screen are listed chronologically (in order of placement). By clicking on the header of the Title column, you can sort them by title.